Hello!
It often becomes a requirement for certain levels of clients to ensure service level agreements for uptime and redundancy are kept. What does this mean? Well we want to ensure that a particular site can withstand a single point of failure, which usually means we would need to expand the services across multiple endpoints.
This is not a new requirement and usually is not something one would consider for small or even medium sized businesses because the costs essentially skyrocket because at this level of redundancy you need someone to design the infrastructure, roll it out, manage it, monitor it and then you need infrastructure resources such as multiple servers , load balancers and similar services to ensure this type of redundancy is kept.
The purpose of this post is to walk you through, in technical terms, how to roll out a WordPress site using industry standard best practices, tools and processes to ensure your WordPress site can scale. I’ll talk about infrastructure options (web hosts), then I’ll break down a very standardized (tried and tested) way of rolling out a redundant scalable WordPress site which can hopefully be applicable on any infrastructure provider.
Infrastructure Requirements to Scale your WordPress site

What does this mean exactly? Well there are some bare minimums that you, as someone who is relatively familiar with systems administration, would need in order to accomplish scaling your WordPress site. You will need the ability to deploy at least 3 servers (virtual instances or dedicated servers). The key is you need to be able to own these servers with root access. There will be database clustering and file synchronization systems in place.
Amazon Web Services
AWS is an easy one. You can quickly, easily and cost effectively roll out instances across multiple availability zones. You can also implement Multi-AZ RDS (database servers) that are by design redundant. AWS also offers a load balancing service (ELB) to balance the load of incoming traffic to be distributed across your 3 instances.
Now this is great, AWS makes it easy to implement via their web interface and you can spin up 3 EC2 instances across availability zones or geographic regions. With the latter you would not be able to use redundant RDS, so make note of that.
Traditional Virtual or Dedicated Instances
This can be applicable for any hosting provider, including hosts like Digital Ocean, Linode, Vultr and everything in between. Same idea as with AWS, but you just would need to create 3 instances. If possible you would need to ensure that these instances are not all on the same underlying hardware. This could mean coordinating with the respective support department or ensuring that you are spinning up instances in different geographic zones.
Network Connectivity & Bandwidth
In a perfect scenario, all of your instances can communicate with eachother on a fast private LAN. If this cannot be arranged, then at the very least your bandwidth limitations should not be affected by communication between your 3 instances. Usually internal traffic in most hosting providers is not counted against your bandwidth limits, however its best to be prudent and check all of this over to ensure everything is optimal. Ideally the traffic between instances should be as fast as possible. Sometimes web hosts, when creating your instances, will give you different options for internal / external network speeds so its important to be aware of these options and make your choices wisely with this in mind.
Load balancing
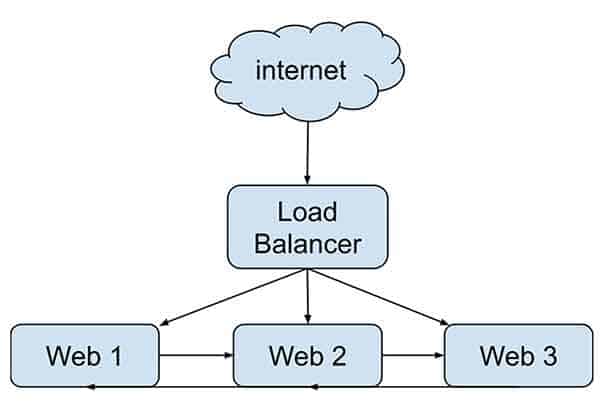
The only other requirement of the web host that you choose is that it needs to support an option to create a load balancer. You can read more about load balancing if this is something you are unfamiliar. Essentially a load balancer, as the name implies, will split the requests coming into your site across your 3 instances.
Load balancers should also be able to detect if one of the 3 instances is not responding. If it detects this, it should no longer send traffic to the “sick” instance and subsequently forward the traffic to whatever “healthy” instances are remaining. You can adjust this type of logic in the form of whats called a status check. Your load balancer can poll each instance with a custom url that you can configure to return a HTTP 200 so the load balancer knows its healthy.
You can even take it a step further and configure the status checks to poll a URL that executes a PHP script on your instance. That PHP script can check things like database connectivity and whatever else you can think of. The PHP script can conditionally return a HTTP 200 response if those internal checks pass. Hopefully this gives you an idea of how intelligent you can make these status checks.
High Level Requirements for scaling WordPress
Before I get started on how to scale WordPress in an enterprise, fully redundant environment, I wanted to give a high level overview of how we will be implementing this.
No user generated content : centralized admin server
If you dont have user generated content on your site and all your changes are made by administrators (like you), then establishing a separate instance just for “Staging” changes means that you are taking advantage of the many benefits of having what is essentially a stopgap for all changes to your site. One of the obvious benefits is that there is a built-in QA process for all changes moving forward.
Editors and administrators would love this because they can essentially approve changes before they are pushed out. In order to have a staging site with a mechanism to “push” the changes live (changes could be file, media or content / database), you would need to implement a push system. Thankfully we have already outlined how to do this in a previous post : How to integrate Jenkins into your WordPress site to automate pushes
Once your staging site is setup , you now have a clean unidirectional flow of all changes : staging to production.
User generated content : file synchronization or clustering
If users are making changes to your site, such as in a busy e-commerce site scenario, then pushing changes from staging to production would wipe out these types of changes. This makes the above scenario completely unusable for those who have e-commerce sites or sites with user dashboards, forums and anything along those lines.
What do you do in this scenario? Well since we are implementing a database cluster (detailed below), we could simply implement a file synchronization (faster but messier) of the wp-content/uploads folder between the 3 instances. Alternatively a cleaner (but potentially slower IO throughput) solution would be to specifically implement a file clustering system just for the wp-content/uploads folder.
We’re more in favour of synchronizing the wp-content/uploads folder through automated synchronization scripts as it doesnt impact performance as much. I will detail the synchronization scripts later on in a bit more detail, as well as the file clustering system (gluster).
Nginx configuration for scaling WordPress sites
We use nginx exclusively as a web service for all of our WordPress sites. Rather than go into the technical reasons, I just wanted to note Nginx for each of the 3 instances in our redundant WordPress implementation. You can technically use any web service such as Apache so if you really want to stay with what you are comfortable with, I dont see a problem.
As far as configuration goes, there isn’t any special way you would need to set up Nginx in order to accommodate a 3 instance scenario. The only thing of note is that because your instances are going to be behind a load balancer, the source IP address of the visitor to your site may be obfuscated a bit more than normal. All industry-standard load balancers will pass over the visitors real IP in a header. You usually need to tell nginx to recognize this header and set the real ip from what the load balancer passes to you :
real_ip_header X-Forwarded-For;
set_real_ip_from 10.108.0.0/16;
You can see that set_real_ip_from 10.108.0.0/16 is set as well. That is the subnet mask of the load balancers so you would need to accommodate that and read the specific documentation of the load balancer from your web host.
Similarly to the load balancer sending the real IP of the end-user, the load balancer may be terminating the SSL connection before sending the traffic to your instance. In a best practice scenario, you probably want to continue the SSL traffic from the load balancer to your instance, but if you wanted to ensure that you are forcing SSL your old SSL redirects may not work.
This is because you can potentially create an SSL redirection loop with the load balancer, especially if SSL is terminated at the load balancer. In NGINX to force an SSL redirection, we are checking for a header that is typically passed by the load balancer called http_x_forwarded_proto, which is just a header that stores the HTTP protocol of the originating request. To redirect based on that, and to avoid an SSL redirection loop, we can add this to your Nginx configuration :
# Force SSL
if ($http_x_forwarded_proto != 'https') {
   return 301 https://$host$request_uri;
}
Galera database cluster for WordPress

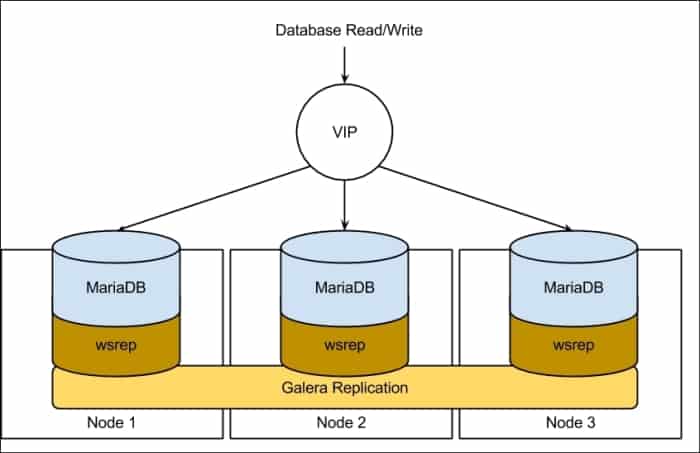
For 3 instances to share one database instance, in a redundant scenario, you will want to cluster your database with Galera. MySQL Galera Cluster is a snychornous multi-master cluste. Essentially it is a database service will run MySQL/MariaDB on each of your instances. Actually Galera is the main reason why we need 3 instances instead of two. There needs to be at least 3 instances to avoid transaction-write conflict errors, called a “split brain“. You can read more about why Galera recommends three nodes instead of two.
Any write to any of the one instances (i.e. if someone posts a comment) will be instantly shared across the other 2 instances. When one instance fails, the other two are aware and handle the reads/writes accordingly. When that failed instance comes back, it (should) automatically note the last point in time that the data was written into the database and implement the updates or changes subsequent to that point.
Because there are many many guides for installing and implementing a multi-master implementation of MySQL Galera Cluster, I wont detail how to actually set it up. You can read more about how to install Galera Cluster here. You can also read more about how to setup a MariaDB Galera multi-master cluster.
There are no special considerations for setting up WordPress specifically. Each instance should be connecting to itself (127.0.0.1) for MySQL.
File Synchronization between redundant servers for WordPress
Remember the two scenarios that were outlined earlier? We have non user-generated content and user-generated content (i.e. e-commerce sites). Where users are not generating content, we can isolate a single instance where administrative changes can be made. Perhaps we can create a separate instance for “Staging” the changes to files, content and media? In this case, we can just have the changes “pushed” out with less of a reliance or priority on continually needing files to be synchronized between the three instances.
If you dont want a 4th instance to be the staging server, then perhaps you can select one of the three production instances to be the “Admin” server. You can set a separate subdomain to point to this server specifically.
Since content changes within the database will be replicated across all three instances via Galera, all we need to worry about are files. Specifically wp-content/uploads but you could also throw in wp-content/plugins if you wanted to install a plugin on one server.
The easiest way to accomplish file synchornization from your “admin” server to the other 2 instances would be to have a cron scheduled task that executes a simple script to rsync the appropriate folders to the other node. This is less performance intensive as rsync only copies files if the differential comparison doesnt match.
You can see a real-world example of such a file synchronization script, specifically designed for WordPress :
#!/bin/bash

# Synchronizes files every X minutes between www1 > www2 & www1 -> www3

if [ ! -f "/tmp/sync_$1.lock" ];
then
        touch /tmp/sync_$1.lock
        /usr/bin/rsync -ravz --delete --progress /var/www/ root@$1:/var/www > /var/log/file-sync-$1.log 2>&1

        if [ "$?" -eq 0 ]
        then
                rm -f /tmp/sync_$1.lock
                exit 0
        else
                rm -f /tmp/sync_$1.lock
                exit 1
        fi
else
        if test `find /tmp/sync_$1.lock -mmin +30`
        then
                rm -f /tmp/sync_$1.lock
                exit 1
        else
                echo "Lock file exists"
                exit 1
        fi
fi
You can see that the above shell script takes a user argument, namely the IP address of the destination server. The cron scheduled task entries would then look like this :
# File synchronization
*/2 * * * * /bin/sh /usr/local/bin/sync-files.sh 192.168.0.2 > /dev/null 2>&1
*/3 * * * * /bin/sh /usr/local/bin/sync-files.sh 192.168.0.3 > /dev/null 2>&1
You can also see in the above shell script that we are simply synchronizing the entire /var/www folder , or the root of your website. Again this will accommodate not only media uploads and plugin changes, but WordPress updates and basically everything else. You can customize this based on whats applicable or relevant to your scenario. I would consider the file synchronization process to be as basic as you can get for scaling WordPress to mulitple redundant servers. It works in most scenarios and has minimal performance impact.
How to use GlusterFS file clustering on multiple redundant servers for scaling WordPress

File clustering can cause much more problems than they solve in some scenarios, so be careful with this one. This is especially true if you are dealing with virtual or cloud resources where things like raw disk IO, CPU speed and network throughput are obfuscated or shared across multiple virtual resources.
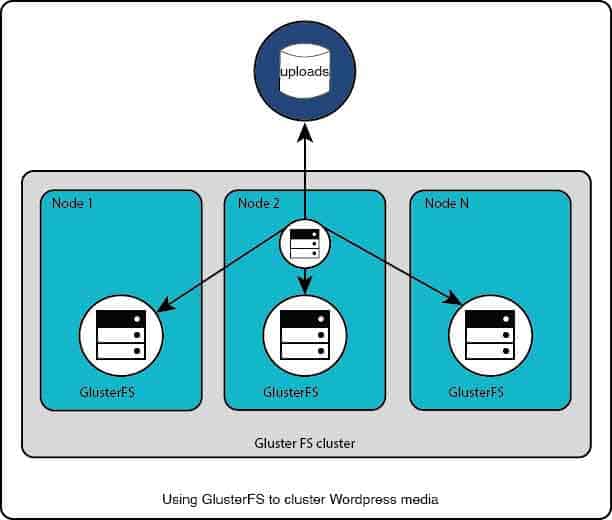
GlusterFS is a great system to not only cluster your files across multiple servers but inherently has support for clustering your filesystems across multiple geographic endpoints.
For this system I would suggest that you restrict all file clustering to static media files , such as what you would find in the wp-content/uploads folder. You absolutely do not want to use file clustering for the entire WordPress root folder as that would cause severe bottleneck issues for PHP processing and have adverse effects to the performance of your site.
To set up GlusterFS, essentially you are setting up the server services on all three instances, creating the “brick” or data, then creating the file share. You then mount the share on each of the instances. Files / folder changes are replicated across all three instances once its set up.
Again, similarly with Galera, I wont detail specific setup instructions. Rather you can explore the multitude of how-to documents with respect to setting up GlusterFS on your server.
Once everything is set up, you can set up an auto mount of the share in your /etc/fstab file :
127.0.0.1:wordpressvolume /var/www/public_html/wp-content/uploads glusterfs defaults,_netdev 0 0So we are mounting the share specifically in the wp-content/uploads folder. We could also mount it somewhere else and simply symlink the wp-content/uploads folder to point to the cluster.
Test the implementation! Upload images and look into performance tuning Gluster if you notice any problems. Remember that these types of problems with bottlenecks and speed may be difficult to diagnose because they could be specific to how the web host allocates virtual resources.
A note about AWS and RDS with scaling WordPress
Lets say that money is no object! The absolute easiest way to implement the above scenario would be to utilize Amazon Web Services. You could set up three EC2 instances, with either the file synchronization or file clustering that I detailed above. You could also look at using S3 for media across all three instances on EC2 instead of file synchronization or clustering. There are plugins that push all media to S3 that you could look into in this scenario.
You then can create a load balancer in AWS very easily. The apex of your domain can then point to the elastic load balancer which then points to the three instances you created.
For database clustering on AWS, you could simply set up an RDS instance with redundancy enabled. This creates a read-replica database that seamlessly fails over in the event of a failure on the main RDS instance. You then would point all three instances to the RDS hostname in your wp-config.php file and you now have database clustering!
Less maintenance, less headaches but again with AWS you will end up spending more than if you did the clustering and setup yourself.
I hope this guide helps those out there that are looking to scale their (busy) WordPress sites!