
Hello!
We love integrating Jenkins into development workflow. Typically Jenkins would be used for custom development projects to streamline the development “push” process in order to seamlessly integrate code changes from a testing / staging environment over to the live environment.
For frameworks like Laravel or Django, this works very nicely. Until recently, we haven’t considered integrating Jenkins into our development workflow for WordPress projects simply because it seemed like overkill. It wasn’t until a few larger WordPress projects came along that required a standalone staging site to push changes that we considered actually integrating the push process with Jenkins into the WordPress administrative interface.
What this means is that our clients wanted a staging environment to make content and other front facing changes, approve them internally and then initiate a content push from the staging site to the production / live site. From a development perspective we would be able to integrate into this process as well. Code testing and development would happen in our development environment. After testing, we would simply push the changes to the staging server for the client to preview and approve.
Using Jenkins to “push” changes to a live site really just means deciding the best way to “hook” or “trigger” Jenkins to execute your build / deploy process. In our case we crafted a shell script that, when triggered by Jenkins, would deploy the files and database from the staging site to production. A separate post could be made just on the deploy script alone, so I’ll leave that for the next post.
For now we’ll go through our new WordPress Jenkins integration plugin.
Set up Jenkins for WordPress to connect to
First, before getting into how the plugin works (which is really simple by the way), we want to set up Jenkins to receive the API web hook that our plugin will ultimately send. In our scenario we have multiple clients on the same Jenkins server, so we wanted to implement project specific permissions so that users that we would ultimately create for these connections would only have access to the specific projects.
Rather than describe exactly what you need to do to restrict access in this same way, I’ll point you in the direction of two helpful links that will help you integrate more stringent security role and project based permissions.
For the purposes of this post, we’ll simlpy create a new project in Jenkins
Like the screenshot above suggests, there are only a few key factors that you have to remember when creating your Jenkins project for WordPress integration :
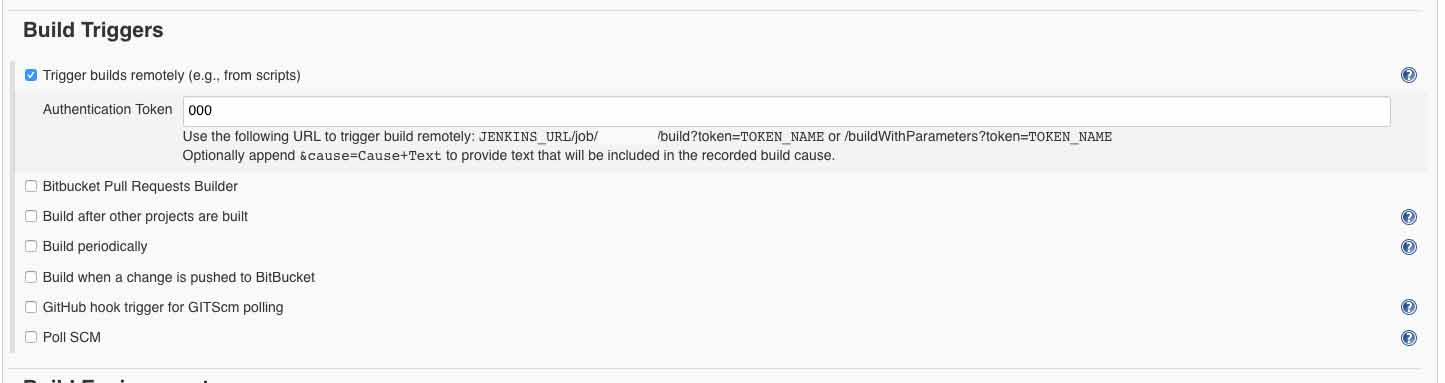
Build Triggers
This is the only setting that really matters. There doesn’t need to be any other settings other than project name (obviously). You need to set up a build trigger for your new project by selecting “Trigger builds remotely (e.g. from scripts)” under the “Build Triggers” section. In this section, you need to generate a random authentication token. I used pwgen to generate a random token. This is one of two key authentication requirements that will be sent via the WordPress Jenkins plugin.
Create User and API token
Now that your project is created with an authentication token, you will want to create a new Jenkins user with an API token. In the Jenkins interface, you will want to go to Jenkins > Manage Jenkins > Manage Users and add a new user here. Simply create the new user here. To see the API token, you will have to login as the user.
Once logged in as the actual user you created, click your user in the top right and click “Configure”. In this screen you will see an “API Token” heading with a button called “Show API token”. Grab the API Token and the authentication token and save them for later.
Install the WordPress Jenkins plugin and set the build URL, token, and API key
You can install the plugin right from the wordpress plugin directory by searching for “Shift8 Jenkins. Once installed, head over to the settings page and you will see 3 fields : Jenkins Build trigger URL , Jenkins build username and Jenkins build API token.
For the build URL, you will want to get the URL from the Project settings plus the authentication token you generated. So your build trigger URL should look something like :
https://jenkins.whatever.com/job/ProjectName/build?token=123456For the build username, it would be the username of the user you created. For the API token, it would be the API token you got when logging in as the user. Once all those items are populated and saved in the settings, you can test the connection by clicking the “Push to production” button. Any errors will be displayed if applicable.
There is also an activity log window that logs every time the red “push to production” button is clicked. The logs will include the user who pushed as well as the date/time.
Nothing happened when clicking the red button!
You might have noticed that nothing happened! This is because you never integrated a build step! In the Jenkins project settings, you will want to add a build step. In our case, we are simply creating a step to “Execute shell”. The shell script executed would take care of the file and database push process from staging to production. We will cover whats inside a WordPress staging to production push script in our next post!