
Hello!
We just released a WordPress plugin, Shift8 Portfolio, to organize your portfolio in a grid using bootstrap scaffolding! This is a very straightforward plugin that we decided to write for our own portfolio page. After using it ourselves it was decided that we needed to share it with the world 🙂
There are many many portfolio type plugins that already exist but the desire was to write something that was very simple and could be expanded later on to accommodate any changes in the custom content that needed to be created such as different sorting categories as well as different shortcode options that might be needed.
There are a few interesting things that had to happen when writing this plugin that might be helpful to share for anyone who is interested.
How to create a custom post type in WordPress
Instead of using the built-in WordPress blog post type, which typically would only be used for blog posts, we created our own custom post type called Shift8 Portfolio. Its relatively straightforward to create the code in your functions.php (or in your plugin’s code) :
// Register post type
add_action( 'init', 'shift8_portfolio_register_cpt' );

function shift8_portfolio_register_cpt() {

        $labels = array(
                'name' => __( 'Shift8 Portfolios', 'shift8_portfolio' ),
                'singular_name' => __( 'Shift8 Portfolio', 'shift8_portfolio' ),
                'add_new' => __( 'Add New', 'shift8_portfolio' ),
                'add_new_item' => __( 'Add New Shift8 Portfolio', 'shift8_portfolio' ),
                'edit_item' => __( 'Edit Shift8 Portfolio', 'shift8_portfolio' ),
                'new_item' => __( 'New Shift8 Portfolio', 'shift8_portfolio' ),
                'view_item' => __( 'View Shift8 Portfolio', 'shift8_portfolio' ),
                'search_items' => __( 'Search Shift8 Portfolios', 'shift8_portfolio' ),
                'not_found' => __( 'No shift8 portfolios found', 'shift8_portfolio' ),
                'not_found_in_trash' => __( 'No shift8 portfolios found in Trash', 'shift8_portfolio' ),
                'parent_item_colon' => __( 'Parent Shift8 Portfolio:', 'shift8_portfolio' ),
                'menu_name' => __( 'Shift8 Portfolios', 'shift8_portfolio' ),
        );

        $args = array(
                'labels' => $labels,
                'hierarchical' => false,
                'description' => 'Shift8 full width portfolio grid',
                'supports' => array( 'editor', 'title' ),
                'public' => true,
                'show_ui' => true,
                'show_in_menu' => true,
                'menu_position' => 5,
                'menu_icon' => 'dashicons-grid-view',
                'show_in_nav_menus' => false,
                'publicly_queryable' => true,
                'exclude_from_search' => true,
                'has_archive' => false,
                'query_var' => true,
                'can_export' => true,
                'rewrite' => array(
                        'slug' => 'portfolio',
                        'with_front' => true,
                        'feeds' => true,
                        'pages' => true
                ),
                'capability_type' => 'post'
        );

register_post_type( 'shift8_portfolio', $args );
}
If you find yourself constantly creating custom post types for your WordPress installations, you might find this website very useful. Through asking a series of questions on a form, the aforementioned website auto generates the code you need to create th custom post type.
Create custom meta fields and meta boxes for your custom post type in WordPress
So what do you do next after you create a custom post type? Well there’s really no point in doing creating custom post types if you are only going to be using the same fields as there would be for the regular wordpress posts. This means we would need to create additional fields for the custom post type.
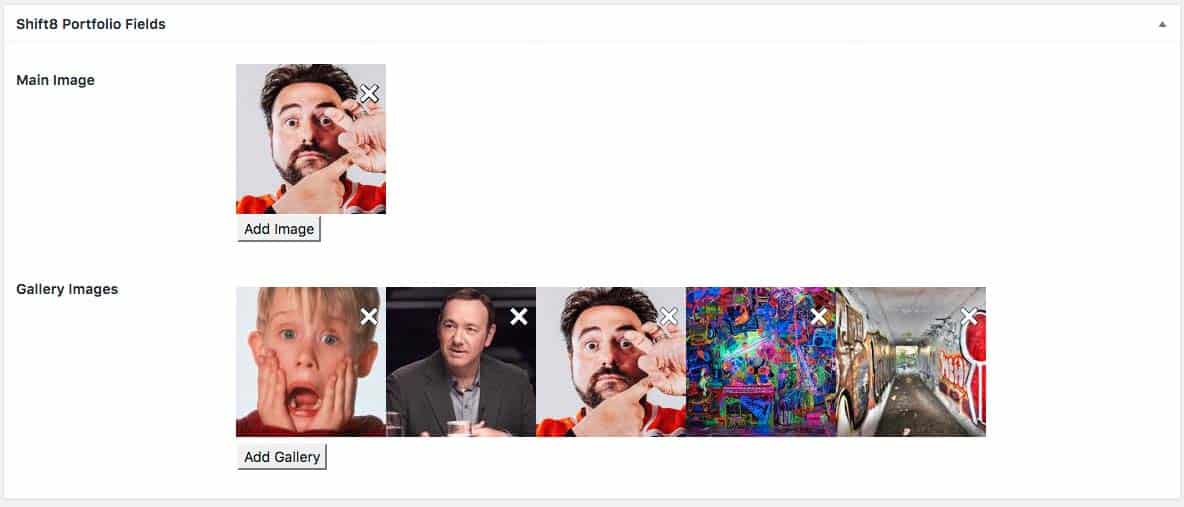
We want to create custom “meta boxes” that would contain fields for our custom post type. In our scenario we simply need to be able to add a main portfolio image which is what would be used to build the grid of portfolio images. Then we would want to add a gallery of additional images to be displayed on the single portfolio item page (single post).
We first would want to create the meta box area where all the input fields will be contained :
// Add the Meta Box
function shift8_portfolio_add_custom_meta_box() {
    add_meta_box(
        'custom_meta_box', // $id
        'Shift8 Portfolio Fields', // $title
        'shift8_portfolio_show_custom_meta_box', // $callback
        'shift8_portfolio', // $page
        'normal', // $context
        'high'); // $priority
}
add_action('add_meta_boxes', 'shift8_portfolio_add_custom_meta_box');
Then we want to create the meta fields that will be held within the meta box :
// Field Array
$prefix = 'shift8_portfolio_';
$custom_meta_fields = array(
    array(
        'label'=> 'Main Image',
        'desc'  => 'This is the main image that is shown in the grid and at the top of the single item page.',
        'id'    => $prefix.'image',
        'type'  => 'media'
    ),
    array(
        'label'=> 'Gallery Images',
        'desc'  => 'This is the gallery images on the single item page.',
        'id'    => $prefix.'gallery',
        'type'  => 'gallery'
    ),
);
The above code won’t really be much use until you can write a function that will show it in the administrative area when adding/editing a post in your custom type :
// The Callback
function shift8_portfolio_show_custom_meta_box($object) {
        global $custom_meta_fields, $post;
        // Use nonce for verification
        echo '';

        // Begin the field table and loop
        echo '
‘; foreach ($custom_meta_fields as $field) { // get value of this field if it exists for this post $meta = get_post_meta($post->ID, $field[‘id’], true); // begin a table row with echo ”; } // end foreach echo ‘
| ‘; switch($field[‘type’]) { case ‘media’: $close_button = null; if ($meta) { $close_button = ”; } echo ‘
‘ . $close_button . ‘
‘; break; case ‘gallery’: $meta_html = null; if ($meta) { $meta_html .= ‘
‘; } $meta_html .= ‘ ‘; } echo ‘ ‘ . $meta_html . ‘ ‘; break; } //end switch echo ‘ |
'; // end table
}
The above function is called in line 6 of “add custom meta box” function. The purposes of the above function are to build the input area when adding or editing new content within your custom post type. You can see in the function that we are only dealing with two input types : media and gallery. You can see what the meta box looks like here :
How to securely process input within your WordPress plugin
This is and always should be a primary concern : handling user input securly within your WordPress plugin. The fantastic team at WordPress has put together a very informative reference page for all the best practices and expectations for securely handling user input.
Its irrelevant whether the user input is by a WordPress administrator or an anonymous end-user, all input needs to be validated, sanitized and escaped. Failing to do so will not only risk having your plugin rejected by the review team, but a security vulnerability being discovered after your plugin is released to the public (which is much worse obviously).
Here is how we are saving the data from the meta box inputs created above :
// Save the Data
function shift8_portfolio_save_custom_meta($post_id) {
        global $custom_meta_fields;

        // Verify nonce
        if (!wp_verify_nonce($_POST['custom_meta_box_nonce'], basename(__FILE__)))
                return $post_id;
        // Check autosave
        if (defined('DOING_AUTOSAVE') && DOING_AUTOSAVE)
                return $post_id;
        // Check permissions
        if ('page' == $_POST['post_type']) {
                if (!current_user_can('edit_page', $post_id))
                        return $post_id;
        } elseif (!current_user_can('edit_post', $post_id)) {
                return $post_id;
        }

        // Loop through meta fields
        foreach ($custom_meta_fields as $field) {
                $new_meta_value = esc_url($_POST[$field['id']]);
                $meta_key = $field['id'];
                $meta_value = get_post_meta( $post_id, $meta_key, true );

                // If theres a new meta value and the existing meta value is empty
                if ( $new_meta_value && $meta_value == null ) {
                        add_post_meta( $post_id, $meta_key, $new_meta_value, true );
                // If theres a new meta value and the existing meta value is different
                } elseif ( $new_meta_value && $new_meta_value != $meta_value ) {
                        update_post_meta( $post_id, $meta_key, $new_meta_value );
                } elseif ( $new_meta_value == null && $meta_value ) {
                        delete_post_meta( $post_id, $meta_key, $meta_value );
                }
        }
}

add_action('save_post', 'shift8_portfolio_save_custom_meta');
Depending on how the input field is being used, for example if its to be a URL or a css class then you could escape the input variable (when it is assigned) with esc_url or esc_attr. Input must be escaped prior to being added to new content or updated with existing content (add_post_meta and update_post_meta functions respectively).
There is more to be discussed here but hopefully the challenges faced with creating this plugin will help others out there! Next post I will go over how to manipulate the WordPress media library popup with jQuery to be able to add single media files or galleries within your custom post types.